Ocelot是一个基于.net core的开源webapi服务网关开源项目,功能比较强大,Github项目地址为:https://github.com/ThreeMammals/Ocelot,关于Ocelot的学习资料可以看看张善友的网站:http://www.csharpkit.com/apigateway.html。
Ocelot的路由设置是基于配置文件的,同样在Ocelot中使用Consul做服务发现时,也是基于配置文件,当我们修改路由或者需要往Consul中添加ServiceName的时候,需要修改配置文件,网关服务也需要重启,这当然不是我们想要的。
在张善友的帮助下,得知可以通过调用api的方式来修改Ocelot的配置文件,官方文档:https://ocelot.readthedocs.io/en/latest/features/administration.html,本文以示例的方式来介绍怎样通过调用api的方式修改Ocelot的配置文件。
环境
- .net core:2.1.4
- Ocelot:6.0
- IdentityServer4:2.2.0
准备
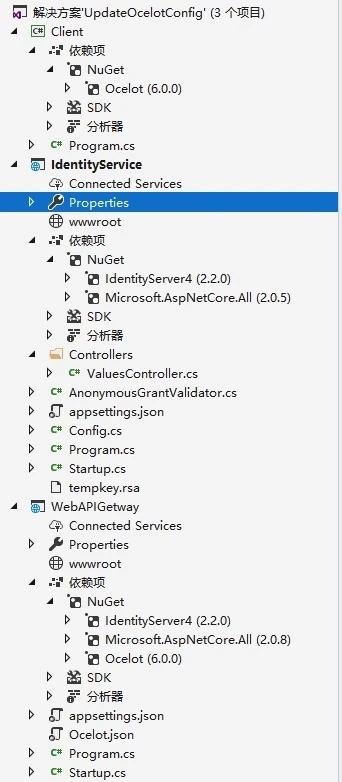
使用VS2017创建解决方案UpdateOcelotConfig,并添加三个项目:
Client
- 控制台项目
- 添加Ocelot包引用
IdentityService
- WebAPI项目
- 添加IdentityServer4包引用
WebAPIGetway
- WebAPI项目
- 添加IdentityServer4包引用
- 添加Ocelot包引用
项目创建完成后如下图:
IdentityService
该项目使用IdentityService4实现一个认证服务,因为在调用Ocelot的api接口时需要用到认证。 1、首先添加对IdentityService4的NuGet包引用; 2、添加Config.cs类,代码如下:
public class Config
{
    public static IEnumerable<ApiResource> GetApiResources()
    {
        return new List<ApiResource>
        {
            new ApiResource("s2api", "My API")
        };
    }
    public static IEnumerable<Client> GetClients()
    {
        return new List<Client>
        {
            new Client
            {
                ClientId = "client",
                AllowedGrantTypes =GrantTypes.ClientCredentials,
                ClientSecrets =
                {
                    new Secret("secret".Sha256())
                },
                AllowedScopes = { "s2api" }
            }
        };
    }
}
3、Startup类修改,代码如下:
public void ConfigureServices(IServiceCollection services)
{
    services.AddIdentityServer()
        .AddDeveloperSigningCredential()
        .AddInMemoryApiResources(Config.GetApiResources())
        .AddInMemoryClients(Config.GetClients());
}
public void Configure(IApplicationBuilder app, IHostingEnvironment env)
{
    if (env.IsDevelopment())
    {
        app.UseDeveloperExceptionPage();
    }
    app.UseIdentityServer();
}
4、修改项目的启动端口为9500。
WebAPIGetWay
该项目是使用Ocelot的网关服务,具体实现步骤如下: 1、添加Ocelot和IdentityService4的NuGet包引用; 2、添加Ocelot.json配置文件,内容如下:
{
  "ReRoutes": [
  {
      "DownstreamPathTemplate": "/api/values",
      "DownstreamScheme": "http",
      "DownstreamHostAndPorts": [
      {
          "Host": "localhost",
          "Port": 10001
      }
      ],
      "UpstreamPathTemplate": "/a/api/values",
      "UpstreamHttpMethod": [ "Get" ]
   }
   ],
   "GlobalConfiguration": {
   "BaseUrl": "http://localhost:10000/"
   }
}
3、修改Program.cs类,添加对Ocelot.json文件的引用
public static IWebHost BuildWebHost(string[] args) =>
    WebHost.CreateDefaultBuilder(args)
        //add ocelot json config file
        .ConfigureAppConfiguration((hostingContext, builder) => {
         builder
            .SetBasePath(hostingContext.HostingEnvironment.ContentRootPath)
            .AddJsonFile("Ocelot.json")
            .AddEnvironmentVariables();
        })
        .UseStartup<Startup>()
        .UseUrls("http://*:10000")
        .Build();
4、Startup类修改,代码如下:
public void ConfigureServices(IServiceCollection services)
{
    Action<IdentityServerAuthenticationOptions> options = o =>
    {
        //IdentityService认证服务的地址
        o.Authority = "http://localhost:9500";
        //IdentityService项目中Config类中定义的ApiName
        o.ApiName = "s2api";
        o.RequireHttpsMetadata = false;
        o.SupportedTokens = SupportedTokens.Both;
        //IdentityService项目中Config类中定义的Secret
        o.ApiSecret = "secret";
    };
    services.AddOcelot()
        .AddAdministration("/admin", options);
}
public void Configure(IApplicationBuilder app, IHostingEnvironment env)
{
    if (env.IsDevelopment())
    {
        app.UseDeveloperExceptionPage();
    }
    app.UseOcelot().Wait();
}
4、修改项目的启动端口为10000.
使用Postman测试下WebAPIGetway和IdentityService
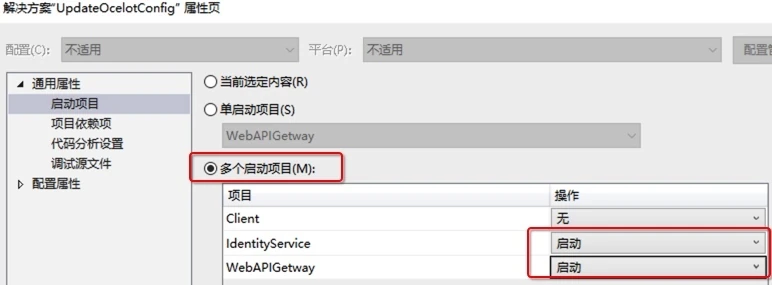
1、设置解决方案的属性,同时启动两个项目
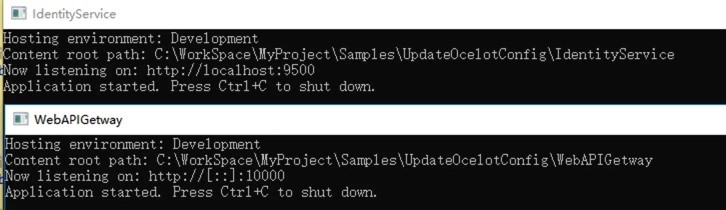
启动后如下图:
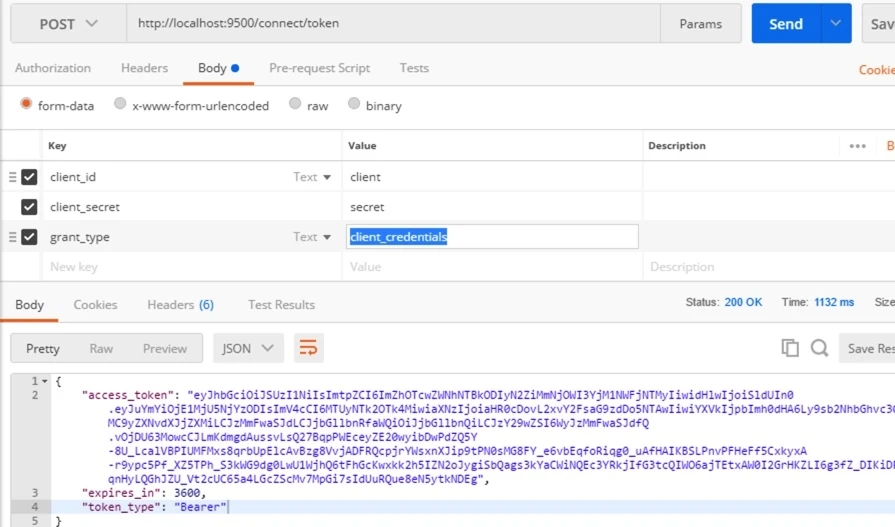
2、在Postman中调用 http://localhost:9500/connect/token,获取token,调用方式为Post,form-data传三个参数:
- client_id:client
- client_secret:secret
- grant_type:client_credentials
调用成功后如下图:
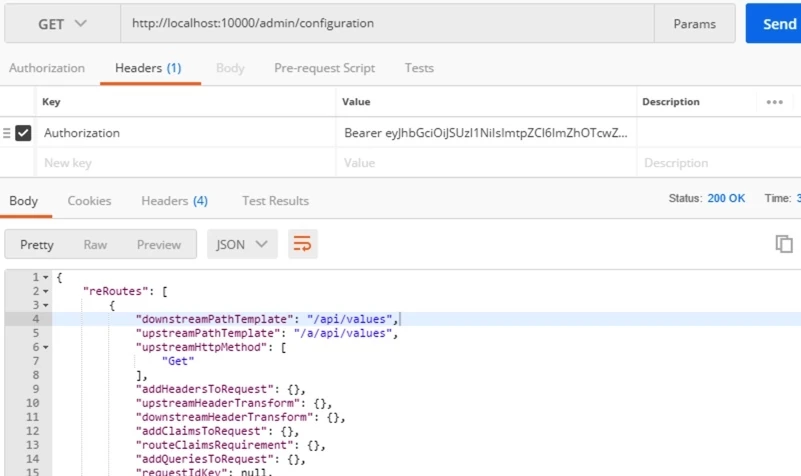
3、在Postman中调用接口 http://localhost:10000/admin/configuration 获取Ocelot的配置,接口路径中的admin是在WebAPIGetway项目中的Startup类中定义的
services.AddOcelot()
    .AddAdministration("/admin", options);
该接口请求为Get请求,需要在Headers中设置上面获取的token,格式为:
Authorization:Bearer token
请求成功如下图:
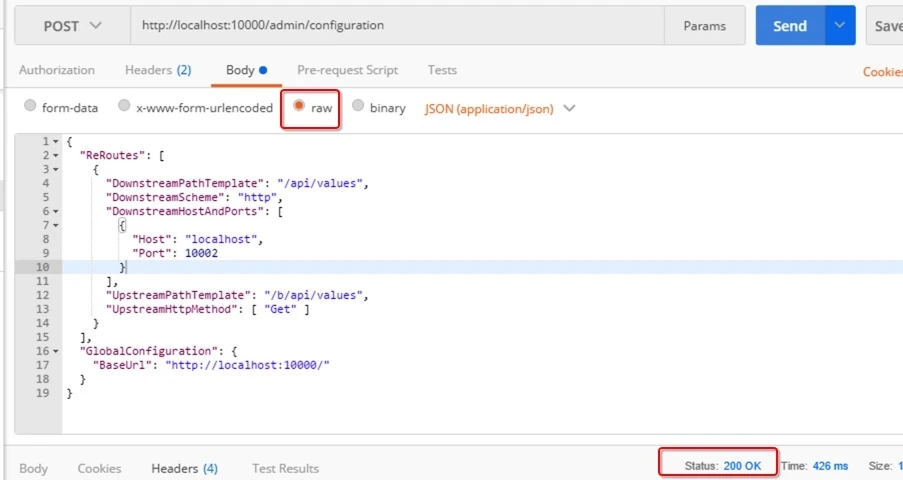
4、在Postman中通过接口 http://localhost:10000/admin/configuration 修改配置,修改和获取配置的接口地址一致,修改时请求为Post,同样在Headers中需要添加token,另外还需要设置Content-Type,格式如下:
Authorization:Bearer token
Content-Type:application/json
请求的body就是调整后的json数据,调用成功回返回200,如下图:
5、在WebAPIGetway项目的运行目录中打开Ocelot的配置文件,验证是否修改成功。
使用代码方式来修改配置文件
通过Postman来进行测试如果能够验证通过,说明WebAPIGetway和IdentityService都运行正常,下面在Client项目中用代码的方式来进行配置文件的修改。Client代码如下:
namespace Client
{
    class Program
    {
        static void Main(string[] args) => MainAsync().GetAwaiter().GetResult();
        private static async Task MainAsync()
        {
            //需要修改的配置
            var configuration = new FileConfiguration
            {
                ReRoutes = new List<FileReRoute>
                {
                    new FileReRoute
                    {
                        DownstreamPathTemplate = "/api/values",
                        DownstreamHostAndPorts = new List<FileHostAndPort>
                        {
                            new FileHostAndPort
                            {
                                Host ="localhost",
                                Port = 10001,
                            },
                            new FileHostAndPort
                            {
                                Host ="localhost",
                                Port = 10002,
                            }
                        },
                        DownstreamScheme = "http",
                        UpstreamPathTemplate = "/c/api/values",
                        UpstreamHttpMethod = new List<string> { "Get","Post" }
                    }
                },
                GlobalConfiguration = new FileGlobalConfiguration
                {
                    BaseUrl = "http://localhost:10000/"
                }
            };
            // 从元数据中发现客户端
            var disco = await DiscoveryClient.GetAsync("http://localhost:9500");
            // 请求令牌
            var tokenClient = new TokenClient(disco.TokenEndpoint, "client", "secret");
            var tokenResponse = await tokenClient.RequestClientCredentialsAsync("s2api");
            if (tokenResponse.IsError)
            {
                Console.WriteLine(tokenResponse.Error);
                return;
            }
            var client = new HttpClient();
            client.SetBearerToken(tokenResponse.AccessToken);
            HttpContent content = new StringContent(JsonConvert.SerializeObject(configuration));
            content.Headers.ContentType = new MediaTypeHeaderValue("application/json");
            var response = await client.PostAsync("http://localhost:10000/admin/configuration", content);
            Console.ReadLine();
        }
    }
}
思考
1、Ocelot文档中介绍可以使用外部的IdentityService服务,也可以用内置的,各有什么优缺点? 2、上面例子中是直接将json数据去做更新,有没有什么弊端?是否应该先获取配置,做修改后再更新?
示例代码
本文的示例代码已经放到Github上:https://github.com/oec2003/StudySamples/tree/master/UpdateOcelotConfig
评论
评论组件按需加载,不影响文章阅读速度。