在Asp.Net中使用jQueryEasyUI 前言 最近做一个小工具,列表显示页面准备使用jQuery的UI框架,因为之前知道有jQWidgets这个框架,所以直接就下载下来使用了,jQWidgets 的功能很强大,Demo和文档也非常详细,但使用后发现有几个问题就果断放弃了使用jQWidgets:
页面加载速度比较慢
当列表字段过多出现横向滚动条时,拖动滚动条非常卡(在IE下都很卡,Chrome好点)
分页取数稍显麻烦,也可能是我没研究透。
经过一番比较选择了jQueryEasUI ,目前最新版本为1.3.1:
其实是用类似的框架,看看官网的文档也就OK了,本文是我最近是用jQueryEasyUI的一个总结,也可以让初使用jQueryEasyUI的朋友少走弯路。
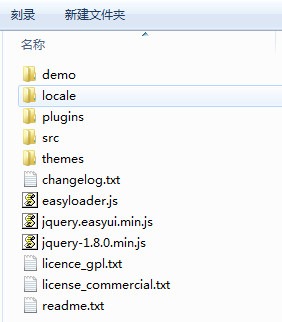
下载引用 下载后解压的文件目录如下图:
demo:JQueryEasyUI的一些示例页面,在项目使用可以将该目录删除
locale:该目录中是一些本地化文件,用来支持不同的语言,如中文可以引用其中的easyui-lang-zh_CN.js
plugins和src:这两个目录中是支持JQueryEasyUI各种功能的js文件
themes:主题目录,目录中有三种主题,default、gray和metro,另外还有一个icons目录和icon.css,在页面使用引用icon.css即可。
使用jQueryEasyUI需要引用四个文件,两个css和两个js文件:
1
2
3
4
<link rel="stylesheet" type="text/css" href="../Scripts/jqueryeasyui/themes/gray/easyui.css" /> <link rel="stylesheet" type="text/css" href="../Scripts/jqueryeasyui/themes/icon.css" /> <script type="text/javascript" src="../Scripts/jqueryeasyui/jquery-1.8.0.min.js"></script> <script type="text/javascript" src="../Scripts/jqueryeasyui/jquery.easyui.min.js"></script>
如果需要使用本地化 还需要引用:
1 <script type="text/javascript" src="../Scripts/jqueryeasyui/locale/easyui-lang-zh_CN.js"></script>
jQueryEasyUI Grid的分页 根据官网的文档可以很容易的构建Grid,期初我没有引用本地化文件easyui-lang-zh_CN.js,列表的分页栏显示出来是英文的,在网上查阅后得知可以用代码的方式重新构建分页栏:
1
2
3
4
5
6
7
8
9
//设置分页控件 var p = $('#dg').datagrid('getPager'); $(p).pagination({ pageSize: 10, //每页显示的记录条数,默认为10 pageList: [10, 20, 30, 40, 50], //可以设置每页记录条数的列表 beforePageText: '第', //页数文本框前显示的汉字 afterPageText: '页 共 {pages} 页', displayMsg: '当前显示 {from} - {to} 条记录 共 {total} 条记录' /*onBeforeRefresh:function(){ $(this).pagination('loading'); alert('before refresh'); $(this).pagination('loaded'); }*/ });
后来发现只需要引用本地化文件easyui-lang-zh_CN.js后分页栏就自动显示为中文了。引用本地化文件还可以解决日历控件格式的问题,所以如果是做中文系统建议还是在页面中引用本地化文件。
jQueryEasyUI控件的取值 使用JQuery取控件的值很简单,如下:
1
2
$("#CstName").val(); $("#TaskNo").val(),
如果要使用jQueryEasyUI的日历控件、下拉控件或其他的一些控件,给普通的input、select控件添加一个class即可:
1
2
3
4
5
6
7
<input id="FeedBackDate" name="FeedBackDate" class="easyui-datebox" maxlength="10" style="width: 150px;" /> <select id="IsKfCl" class="easyui-combobox" name="IsKfCl" style="width:150px;"> <option value=""></option> <option value="是">是</option> <option value="否">否</option> </select>
现在取这些控件的值需要使用下面的方法:
1
2
$("#FeedBackDate").datebox("getValue"); $("#IsKfCl").combobox("getValue");
通常在Grid列表控件的上方会添加一些按钮如:新增、编辑、删除等,如下面效果:
在jQueryEasyUI中可以使用ToolBar来实现,ToolBar可以在DataGrid初始化时定义,如下:
1
2
3
4
5
6
7
8
9
10
11
12
13
14
15
16
17
18
19
20
21
22
23
24
25
26
27
28
29
30
31
32
33
34
35
36
37
38
39
40
41
42
43
44
45
46
47
48
49
50
51
52
53
54
55
56
57
58
$('#dg').datagrid({ collapsible: false, fitColumns: true, singleSelect: true, remoteSort: false, sortName: 'RoleName', sortOrder: 'desc', nowrap: true, method: 'get', loadMsg: '正在加载数据...', url: '...', frozenColumns: [[ { field: 'ck', checkbox: true } ]], columns: [[ { field: 'ID', title: 'ID', width: 80, sortable: true }, { field: 'Name', title: '名称', width: 100,sortable:true } ]], pagination: true, pageNumber: 1, rownumbers: true, toolbar: [ { id: 'btnAdd', text: '添加', iconCls: 'icon-add', handler: function() { $("#name").val(""); add(); } }, '-', { id: 'btnEdit', text: '编辑', iconCls: 'icon-edit', handler: function() { var selected = $('#dg').datagrid('getSelected'); if (selected) { var name = selected.Name; $("#Name").val(name); edit(); } } }, '-', { id: 'btnDelete', text: '删除', disabled: true, iconCls: 'icon-remove', handler: function() { } } ] }); });
还有一种方法就是将ToolBar单独定义在div中,然后在DataGrid的初始化时关联div的ID,首先定义ToolBar的div,ID为tb:
1
2
3
4
5
6
7
8
9
10
11
12
13
14
15
<!--工具栏--> <div id="tb" style="padding: 5px; height: auto;display:none;"> <div style="margin-bottom: 5px"> <a href="#" class="easyui-linkbutton" iconcls="icon-add" onclick="add()">新增</a> <a href="#" class="easyui-linkbutton" iconcls="icon-edit" onclick="edit()">编辑-</a> <a href="#" class="easyui-linkbutton" iconcls="icon-edit" onclick="copyAdd()">拷贝′</a> <a href="#" class="easyui-linkbutton" iconcls="icon-cut" onclick="copyVss()">复制地址·</a> <a href="#" class="easyui-linkbutton" iconcls="icon-save" onclick="downReg()">下载REG</a> <a href="#" class="easyui-linkbutton" iconcls="icon-remove" onclick="del()">删除y</a> <!--查询区域--> 区域:<input id="seaArea" style="width: 100px" /> 客户名称:<input id="seaCstName" style="width: 100px" /> <a href="#" class="easyui-linkbutton" iconcls="icon-search" onclick="searchSrcCode()">查询</a> </div> </div>
在DataGrid的初始化时设置toobar属性值为tb:
1
2
3
4
5
pagination: true, pageNumber: 1, rownumbers: true, toolbar: '#tb', ...
单独定义ToolBar个人认为要灵活些,也会让JS代码简洁些。
上面说过了列表的显示,下面就来讲下数据的提交,有两种方式可以实现:
自己组织数据然后用Ajax(GET POST)提交
使用Form表单提交的方式。
我在刚使用的时候是使用的第一种方法:
1
2
3
4
5
6
7
8
9
10
11
12
13
14
15
16
17
18
19
20
21
22
23
24
//保存 function saveFeedBackLog(mode,id) { $.ajax({ type: "POST", dataType: "json", //cache:true, url: "../Ajax/FeedBackLogAjax.ashx?Method=SaveFeedBackLog", data: { FeedBackDate: $("#FeedBackDate").datebox("getValue"), CstName: $("#CstName").val(), TaskNo: $("#TaskNo").val(), FeedBackContent: $("#FeedBackContent").val(), CsZrr: $("#CsZrr").combobox("getValue"), CsYzResult: $("#CsYzResult").val(), IsKfCl: , KfZrr: $("#KfZrr").combobox("getValue"), EndDate: $("#EndDate").datebox("getValue"), KfClDate: $("#KfClDate").val(), Wtyy: $("#Wtyy").val(), Mode:mode, ID:id }, success: function (data) { //..........
当页面字段比较多的时候会比较麻烦,保存时需要将每个字段的值逐一取出传送到后台,编辑时也需要将行中各字段的值逐一取出赋给表单中的控件,后来发现jQueryEasyUI提供Form的Ajax提交的方式,会使代码精简很多,而且使用Form表单提交的方式还能用到jQueryEasyUI提供的一些验证控件。
编辑时赋值给表单
1
2
3
4
5
6
7
8
9
10
11
12
13
14
15
16
17
function edit() { var rowData = $('#dg').datagrid('getSelections'); if (rowData.length == 0) { $.messager.alert('提示', '请选择要编辑的项!','info'); } else if (rowData.length > 1) { $.messager.alert('提示', '只能选择一项进行编辑!','info'); } else { _mode = "2"; var row = $('#dg').datagrid('getSelected'); openDialog(); $('#fm').form('load', row); _srcCodeManageID = row.SrcCodeManageID; url = "../Ajax/SrcCodeManageAjax.ashx?Method=SaveSrcCodeManage&ID=" + row.SrcCodeManageID+"&Mode="+_mode; } }
保存
1
2
3
4
5
6
7
8
9
10
11
12
13
14
15
16
17
18
19
20
//保存 function saveSrc() { $('#fm').form('submit', { url: url, onSubmit: function () { return $(this).form('validate'); }, success: function (data) { if (data =="Success") { $('#dlg').dialog('close'); // close the dialog $('#dg').datagrid('reload'); // reload the user data $.messager.alert('提示', '保存成功!', 'info'); } else if (data=="Error") { $.messager.alert('错误', '系统出错!', 'error'); } } }); }
可以看出第二种方法相比第一种代码精简了很多,而且保存时还能用到表单的一些校验,比如设置必填项、电话、邮件格式等。
当然jQueryEasyUI还有很多其他的控件和功能,有待以后慢慢研究,希望本文对你有所帮助。