发布于 

高可用:Nginx配合keepalived

如果在谷歌中搜索 「Nginx 高可用」,搜索出来的大多都是 Nginx + keepalived 的使用。

所以,本文就介绍下怎样用 Nginx 和 keepalived 来实现应用的高可用。

环境

  • 服务器:CentOS7
    • Server1 : 10.211.55.3
    • Server2 : 10.211.55.14
  • Docker:23.0.5
  • Nginx:1.23.4
  • keepalived:1.3.5

部署

本次测试使用两台测试虚拟机,IP 分别为 10.211.55.3 和 10.211.55.14 ,Nginx 使用 Docker 进行部署,keepalived 直接在服务器部署。架构图如下:

具体部署和配置步骤如下:

1、在两台 CentOS 服务器上安装 docker 和 docker-compose 。

2、在 10.211.55.3 服务器的 /root 目录中创建 nginx-ha 目录,目录内容如下图:

image-20230511110208516

3、docker-compose.yml 文件内容如下:

1
2
3
4
5
6
7
8
9
10
11
12
13
14
15
16
17
18
19
20
21
22
23
24
25
26
27
28
29
30
31
32
33
34
35
version: '3'

networks:
s2_net:
driver: bridge
ipam:
driver: default
config:
- subnet: 172.55.1.0/24

services:
nginx1:
image: nginx:latest
container_name: nginx1
restart: always
ports:
- "9000:80"
volumes:
- ./config/nginx/conf.d:/etc/nginx/conf.d:ro
- ./web:/usr/share/nginx/html
networks:
s2_net:
ipv4_address: 172.55.1.2

nginx-proxy1:
image: nginx:latest
container_name: nginx-proxy1
restart: always
ports:
- "10000:80"
volumes:
- ./config/nginx-proxy/conf.d:/etc/nginx/conf.d:ro
networks:
s2_net:
ipv4_address: 172.55.1.3
  • nginx1:构建一个 web 服务,展示一个静态页面,显示服务器 IP ,能达到验证效果即可;
  • nginx-proxy1:反向代理负载到两台服务器的 web 服务。

4、web 服务的 nginx 配置文件 config/nginx/conf.d/default.conf ,内容如下:

1
2
3
4
5
6
7
8
9
10
11
12
13
14
15
16
17
server {
listen 80;
server_name 10.211.55.3;
client_max_body_size 100M;

location / {
root /usr/share/nginx/html;
index index.html index.htm;
try_files $uri $uri/ /index.html;

}

error_page 500 502 503 504 /50x.html;
location = /50x.html {
root /usr/share/nginx/html;
}
}

5、nginx 负载的配置文件 config/nginx-proxy/conf.d/default.conf ,内容如下:

1
2
3
4
5
6
7
8
9
10
11
12
13
14
15
16
17
18
19
upstream my_web {
server 172.55.1.2 weight=7 max_fails=1 fail_timeout=10s;
server 10.211.55.14:9000 weight=7 max_fails=1 fail_timeout=10s;
}

server {
listen 80;
server_name 10.211.55.3;
client_max_body_size 100M;

location / {
proxy_pass http://my_web;
}

error_page 500 502 503 504 /50x.html;
location = /50x.html {
root /usr/share/nginx/html;
}
}

6、web/index.html 的内容就很简单了,只写了当前服务器的 IP。

1
2
3
4
5
6
7
8
9
<!DOCTYPE html>
<html>
<head>
<title>Welcome to nginx 1</title>
</head>
<body>
<h1>Welcome to nginx IP:11.211.55.3</h1>
</body>
</html>

7、在 nginx -ha 目录中,执行 docker-compose up -d 命令进行容器的构建,构建成功后,使用 docker ps 查看如下图:

这时使用 http://10.211.55.3:10000 或者 http://10.211.55.3:9000 应该都能访问:

8、在 10.211.55.14 服务器上重复第二步到第七步的步骤,部署 web 服务和 nginx 负载,需要注意的是 nginx 负载的配置文件 config/nginx-proxy/conf.d/default.conf 的内容有所不同,upstream 中的 IP 地址需要修改,如下所示:

1
2
3
4
5
6
7
8
9
10
11
12
13
14
15
16
17
18
19
upstream my_web {
server 172.55.1.2 weight=7 max_fails=1 fail_timeout=10s;
server 10.211.55.3:9000 weight=7 max_fails=1 fail_timeout=10s;
}

server {
listen 80;
server_name 10.211.55.14;
client_max_body_size 100M;

location / {
proxy_pass http://my_web;
}

error_page 500 502 503 504 /50x.html;
location = /50x.html {
root /usr/share/nginx/html;
}
}

除此之外,web 的 html 页面中展示的 IP 地址为:10.211.55.14 。

9、在两台服务器上安装 keepalived ,执行下面命令进行安装:

1
yum install -y keepalived

10、使用 yum 安装的 keepalived,配置文件在 /etc/keepalived/ 目录下,将 10.211.55.3 服务器的 keepalived.conf 文件内容替换为下面内容:

1
2
3
4
5
6
7
8
9
10
11
12
13
14
15
16
17
18
19
20
21
22
23
24
25
26
27
28
29
30
31
32
33
34
35
36
37
38
39
40
global_defs {
script_user root
enable_script_security
}

vrrp_script check_nginx {
script /etc/keepalived/check-nginx.sh
interval 2
}

vrrp_instance Vs_1 {
state BACKUP # 定义节点主/备,主MASTER,备BACKUP,这里2个节点均为BACKUP
interface eth0 # 虚拟IP绑定的网卡
virtual_router_id 32 # 集群号,所有节点需要相同
priority 100 # 权重,2个节点权重一致,降低权重后会发生切换
advert_int 1 # 检测间隔

# 抢占模式,(nopreempt非抢占模式),配置为抢占模式时,当节点权重降低时,另外一个高权重节点会抢占服务,发生切换;
# 如果为非抢占模式,上面配置的检查脚本在检查到服务失败后,降低权重,但是不会发生切换。
!nopreempt

authentication {
auth_type PASS
auth_pass 1111 # 各节点密码一致
}

unicast_src_ip 10.211.55.3 # 本端,源地址
unicast_peer {
10.211.55.14 # 对端,目标地址
}
virtual_ipaddress {
10.211.55.4 # 虚拟IP
}
track_interface {
eth0 # 检查网卡健康
}
track_script {
check_nginx
}
}
  • virtual_ipaddress :定义了虚拟 IP 10.211.55.4 ,后续访问将会使用虚拟 IP 进行访问
  • unicast_peer:设置另一台服务器的 IP :10.211.55.14
  • unicast_src_ip:设置当前服务器的 IP:10.211.55.3
  • check_nginx:设置一个心跳检测的脚本

11、10.211.55.14 服务器的配置文件和上面一样,将 unicast_peer 和 unicast_src_ip 设置的 IP 对换即可。

12、check_nginx 设置的心跳检测脚本路径为:/etc/keepalived/check-nginx.sh ,在 /etc/keepalived 目录下创建 check-nginx.sh 文件,内容如下:

1
2
3
4
5
6
7
#!/bin/bash
count=`netstat -ntpl | grep 10000 | wc -l`
if [ $count -gt 0 ]; then
exit 0
else
exit 1
fi
  • 要执行 netstat 命令,需要使用 yum -y isntall net-tools 命令安装相关依赖
  • 这段脚本的意思就是使用 netstat 命令查看当前系统中所有 TCP 连接的状态,然后使用 grep 命令筛选出其中监听端口为 10000 的连接,最后使用 wc -l 命令统计筛选出的行数
  • 使用 if 语句对命令输出结果进行判断。如果监听在 TCP 端口 8888 上的进程数量大于 0,则表示有进程正在监听该端口,那么脚本就会执行 exit 0 命令来退出,并返回一个成功的退出码(0)。反之,如果监听在 TCP 端口 10000 上的进程数量等于 0,则表示没有进程在监听该端口,那么脚本就会执行 exit 1 命令来退出,并返回一个失败的退出码(1)

13、使用下面命令给 check-nginx.sh 文件设置权限:

1
chmod +x check-nginx.sh 

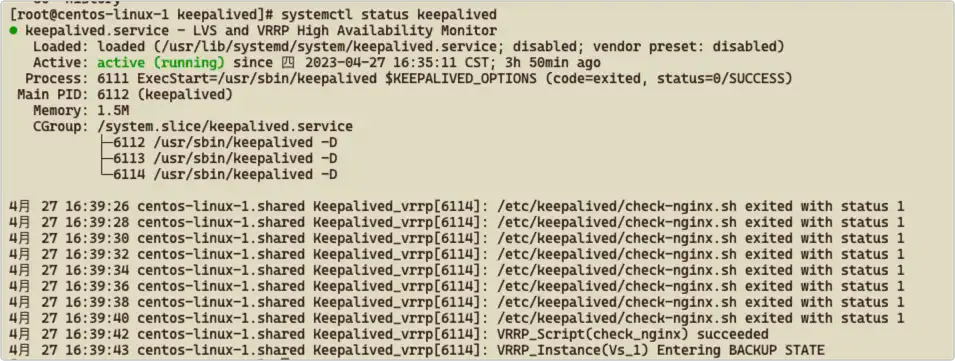
14、配置文件修改好后,执行 systemctl start keepalived 启动 keepalived 服务,使用命令 systemctl status keepalived 可以查看状态,如下图为正常:

验证

1、两台服务器都正常运行时,使用虚拟 IP + 负载 Nginx 端口(http://10.211.55.4:10000)进行访问,正常情况下页面中的 IP 应该在 10.211.55.3 和 10.211.55.14 之间来回切换。

2、关闭 10.211.55.14 服务器的 9000 端口的容器,访问站点页面应该只会出现 IP 10.211.55.3。

3、继续关闭 10.211.55.14 服务器的 10000 端口的容器,站点应该可以继续访问。

4、关闭 10.211.55.14 服务器,站点应该可以继续访问。

5、启动 10.211.55.14 服务器和 9000、10000 端口的容器,访问页面,检查是否恢复了负载切换。

6、同样的操作可以将 10.211.55.3 再来一遍,检查网页访问是否正常。