插件和代码两种方法搞定WordPress回复邮件通知
为了更好的互动,当有人在博客中评论时,我们肯定是希望能够马上知晓,WordPress中默认不提供这样的功能,需要通过插件或是添加代码的方式来实现。
使用插件
使用插件的方式非常简单,安装好插件在后台做相应的配置就好了。现在比较流行的插件是WordPress Thread Comment,下面详细介绍下步骤
1 下载解压后上传到plugin目录中。
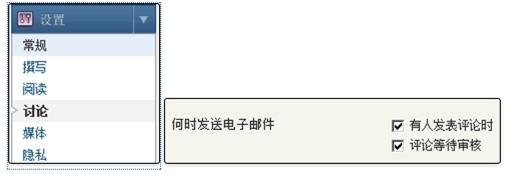
2 进入WordPress后台,在“设置”选项卡中点击讨论,在右边的界面中配置何时发送电子邮件。

3 进入到插件管理中,启用 WordPress Thread Comment 插件。
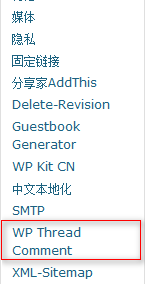
4 启用插件后在“设置”下面会多出WordPress Thread Comment 选项,点击该项在右边的界面中就可以进行相关设置。
使用代码
使用代码的方式其实也并不复杂,代码可以很容易在网上找到。
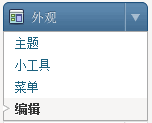
1 点击“外观”下的编辑。
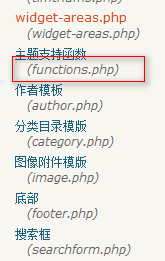
2 在右侧的文件列表中找到functions.php。
3 点击该文件,在中间的编辑区域添加如下代码。
1
2
3
4
5
6
7
8
9
10
11
12
13
14
15
16
17
18
19
20
21
22
23
24
25
26
27
28
29
30
31
32
33
34
35
36
37
38
39
40
41
42
43
| /* 有评论时发送邮件 函数 开始*/
function comment_mail_notify($comment_id) {
$admin_notify = '1'; // admin 要不要收回复通知 ( '1'=要 ; '0'=不要 )
$admin_email = get_bloginfo ('admin_email'); // $admin_email 可改为你指定的 e-mail.
$comment = get_comment($comment_id);
$comment_author_email = trim($comment->comment_author_email);
$parent_id = $comment->comment_parent ? $comment->comment_parent : '';
global $wpdb;
if ($wpdb->query("Describe {$wpdb->comments} comment_mail_notify") == '')
$wpdb->query("ALTER TABLE {$wpdb->comments} ADD COLUMN comment_mail_notify TINYINT NOT NULL DEFAULT 0;");
if (($comment_author_email != $admin_email && isset($_POST['comment_mail_notify'])) || ($comment_author_email == $admin_email && $admin_notify == '1'))
$wpdb->query("UPDATE {$wpdb->comments} SET comment_mail_notify='1' WHERE comment_ID='$comment_id'");
$notify = $parent_id ? get_comment($parent_id)->comment_mail_notify : '0';
$spam_confirmed = $comment->comment_approved;
if ($parent_id != '' && $spam_confirmed != 'spam' && $notify == '1') {
$wp_email = 'no-reply@' . preg_replace('#^www\.#', '', strtolower($_SERVER['SERVER_NAME'])); // e-mail 发出点, no-reply 可改为可用的 e-mail.
$to = trim(get_comment($parent_id)->comment_author_email);
$subject = '您在 [' . get_option("blogname") . '] 的留言有了回复';
$message = '
<div style="background-color:#eef2fa; border:1px solid #d8e3e8; color:#111; padding:0 15px; -moz-border-radius:5px; -webkit-border-radius:5px; -khtml-border-radius:5px;">
<p>' . trim(get_comment($parent_id)->comment_author) . ', 您好!</p>
<p>您曾在《' . get_the_title($comment->comment_post_ID) . '》的留言:<br />'
. trim(get_comment($parent_id)->comment_content) . '</p>
<p>' . trim($comment->comment_author) . ' 给您的回复:<br />'
. trim($comment->comment_content) . '<br /></p>
<p>您可以点击<a href="' . htmlspecialchars(get_comment_link($parent_id)) . '">查看回复的完整內容</a></p>
<p>还要再度光临 <a href="' . get_option('home') . '">' . get_option('blogname') . '</a></p>
<p>(此邮件由系统自动发送,请勿回复.)</p>
</div>';
$from = "From: \"" . get_option('blogname') . "\" <$wp_email>";
$headers = "$from\nContent-Type: text/html; charset=" . get_option('blog_charset') . "\n";
wp_mail( $to, $subject, $message, $headers );
//echo 'mail to ', $to, '<br/> ' , $subject, $message; // for testing
}
}
add_action('comment_post', 'comment_mail_notify');
/* 自动加勾选栏 */
function add_checkbox() {
echo '<input type="checkbox" name="comment_mail_notify" id="comment_mail_notify" value="comment_mail_notify" checked="checked" style="margin-left:20px;" /><label for="comment_mail_notify">邮件通知</label>';
}
add_action('comment_form', 'add_checkbox');
/* 有评论时发送邮件 函数 结束*/
|
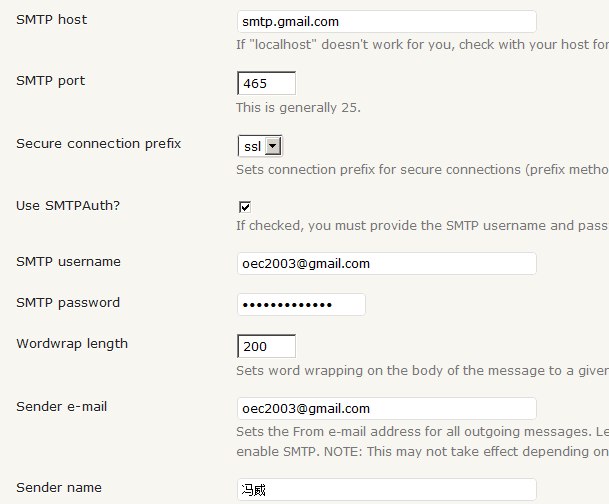
配置SMTP
光进行了上面的步骤可能还不行,还需要配置SMTP,装一个Configure SMTP的插件就可以很方便的进行配置,关于插件的安装启用上面已经说过。
如果使用的是Gmail的邮箱就更方便了,只需选中“Send e-mail via GMail? ”就都配置好了。
如果是其他的邮箱可以在网上搜下相关的配置方法,下面是我配置好的截图。
经过上面的步骤后当有人在你的博客中留言评论时,应该就可以及时收到邮件了。